Twisted's collection of various images that could be considered some possible form of art.

TwistedSilicon

Magic Citrus Fruit Man
Joined
Sep 16, 2017
Messages
278
Nebulae
878
Photoshop skills.
Moving away from the more scenic focused normal builds, and hoping to work with more photo-shop based art peices. Which I had started to do in some of my previous images. I experiemented using more filters and other tools that photoshop provided - following online tutorials.

DGtQX2e.png

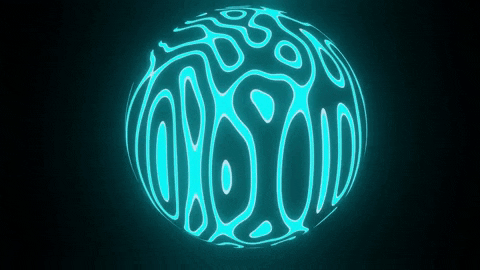
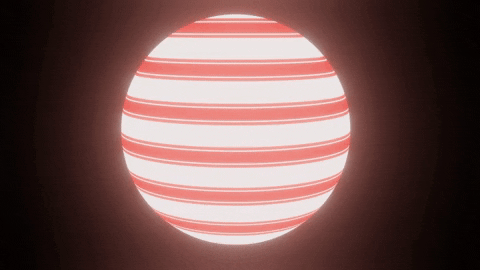
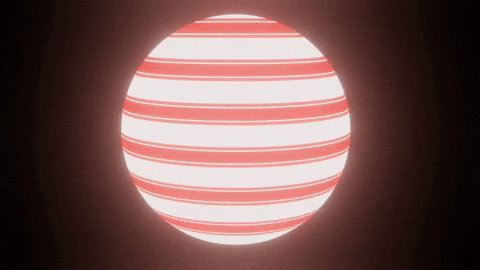
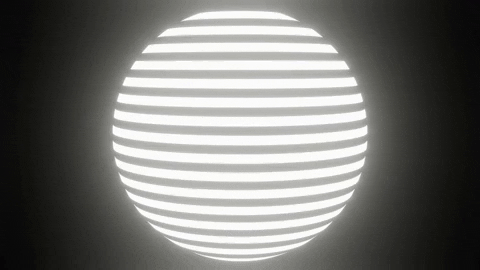
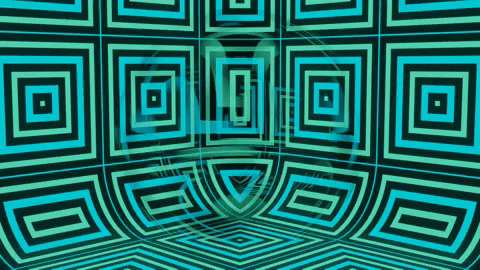
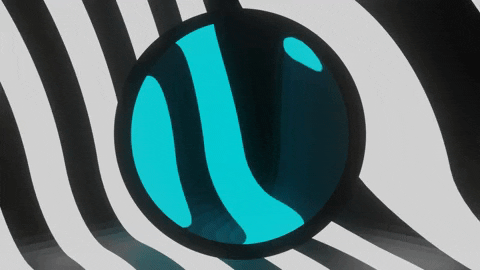
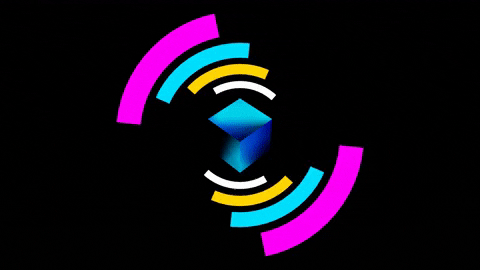
A basic radial explosion. Made by using the polar coordinates filter with a stripe background. It created a pretty satisfying effect that while not perfect. Created a suitable enough base for me to work on. One thing I am slightly annoyed by is the inconsistency of the width of the most middle- stripe directly above the cop's head. It seems too thin and doesn't really seem to fit for me. Don't know why. Just don't like it.
1ueIr4Y.png

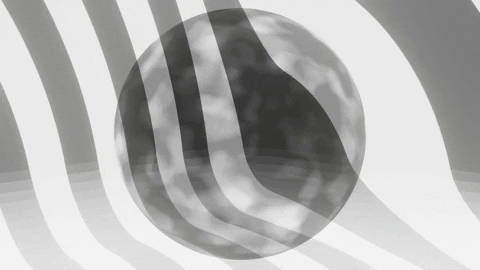
Working with a radial gradient to help simulate the light that would be present on the cop's head normally on the poster to try and remove the difference between the light on the model and the lighting on the poster.
Y3zniMP.png

Combination of the two. Later I'd make the gradient much more stronger so it's effect was more noticable around the edges and left side of the poster.
XN4Aoc6.png

Added a purple gradient upwards to try and differentiate the poster from being too strongly one colour.
Also added a little credit thing.

XN4Aoc6.png


Ny8qlOI.jpg

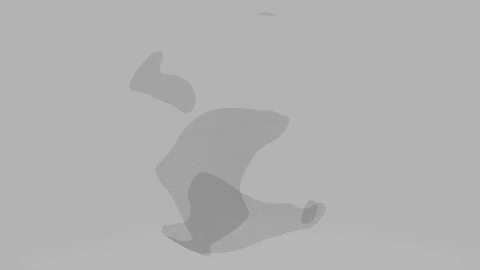
Reference image: Made ingame with no additative rendering software. Mainly used effects. I didn't like the distortion on the mask. No lighting.
KR4y6lb.png

Version One I made using more photo-shop elements. Came out alright... But it felt as if it didn't use enough of the space around it and the swirl didn't feel large / important / powerfull enough.
jWQKNpz.png

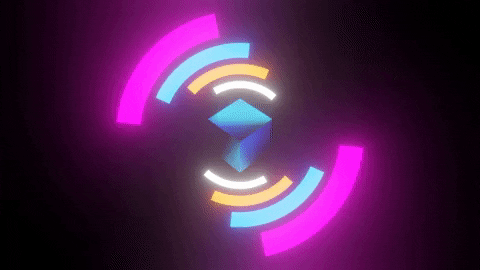
The swirl is larger, and differently coloured to try and re-inforce the more mystical view I wanted on this image. I also added a bright centre to try and make up for the lost brightness due to the change in colour to justify the lighting on the cop. Overall it came out well... But I think I still need to work on the spacing and framing of the picture some more. I'm sure there are plenty of sources online I can draw from. Might also be too dark... Work on brightness / contrast methods for sceneic posters needed so this will probably be my focus. Maybe more monchrome images where brightness is key to differentiating depth and images...
 
Last edited:
Reactions: List

TwistedSilicon

Magic Citrus Fruit Man
Joined
Sep 16, 2017
Messages
278
Nebulae
878
Intermission.
Unfortunately, I'm starting to have to move into more work mode for my upcoming A-levels, not to mention I haven't nearly had enough motivation and / or energy to do art-peices like these anymore. But I'd figured I'd still try and see how this one came out before I start my full revision cycle.
Below.
Sfslyip.png

This was a project I attempted to start a long time ago- back around when I made the desert trail poster, since I didn't feel like creating an entirely new set. I chose to work off this one instead and it came out alright. I seem to remember drawing inspriation from one particular scene in Rango for this?, Can't remember what scene it was though... It came out alright as far as I can tell, but my lack of an actual defined background did somewhat mean adding any fog would completely break the entire thing. Which is probably for the best considering putting fog in a cave is unnatural. I also added a lightsource for the torch taped to the 3rd rebel's back. Which I had to do two renders for since softlamps doesn't allow point lights. Also the more detailed back stalagtites didn't really show up as much as I would like them to unfortunately...
Blender Experimentation.
88NufMm.jpg

Yup!, I'm trying to use blender now. Gmod is good and all for the large sceneic posters where trying to model each and every piece and move them around would be a nightmare. But I think that for more-close up modelling, blender would suit me well. I've been visiting various online guides and walkthroughs and I'm kinda getting the idea of it. Hopefully I'll generate something more than just various default shapes on a plane in the future, but it's a start. Also soft-lighting is so much easier with blender.
 
Last edited:
Reactions: List

TwistedSilicon

Magic Citrus Fruit Man
Joined
Sep 16, 2017
Messages
278
Nebulae
878
Blender Shenanigans

iN0phwL.png


Despite having exams coming up, I have absolutely sunk into Blender - hard. Any spare time I've had, I've been watching YouTube videos, looking at other people's work online etc: I even found an old blender course that I signed up for 2017, ( See image for proof ), and finally got around to doing it. And yes, I am that much of a procastinator I waited 4 years to do an online course I paid money for.

First Experimentations
VDBSQUX.png

Z3F72Fm.png

Simple, basic even?, This was mainly a test to make sure I had gotten the basics down of Blender. I'm not quite an expert editing shapes, but by doing some basic manipulation of the mesh, I managed to make this... Spiral thing? Also the plate was waaay too small for the effect I wanted. But it did well enough for a first render. I learnt how to position things around, manipulate basic shapes and actually render an object.
J1fVmw3.png

Yet again - More experimentation. Messing around with modifiers and using the extrusion tool. I also replicated the base from my first Gmod-Soft lamps poster because it provided a good foundation for the other objects to stand on and directed the user. Hopefully I should be able to recreate some of my other Gmod posters in Blender if they're not too big.
Wu8MlRs.png

This was only made using basic shapes, with 0 editing to the actual meshes themselves. Which- while it does result in really blocky and rotund outcomes, serves well enough here. The main objective of this was to ensure I had a firm and thorough grasp on how to manipulate the baselines meshes - Which I now do!
c8gjn1w.png

Again- Only made using basic shapes, but a bit more detail this time. But while it may look okay from here, there is a lot of clipping in this image. And not to mention the roof felt flat and lifeless since I didn't model it at a slant.... So... Something to come back to for sure. Also used 3 point lighting again. Gmod posters weren't a waste of time! Whoo!

What's Next?
Right now I'm following the Udemy Course (though I did find the beginner youtube videos more inuitive which helped avoided being overwhelmed by the sheer amount of info the Udemy Dumps on you), there's a lot of content to get through which doesn't help by the fact 8/24ths of my day are taken up with revision for my admittedly important A-level exams, but next up on the list of video's on the course it's making a Mayan Pyramid so probably expect to see one of those sometime next week.

 
Last edited:
Reactions: List

TwistedSilicon

Magic Citrus Fruit Man
Joined
Sep 16, 2017
Messages
278
Nebulae
878


Excuse the horrible formatting, but Imgur doesn't like gifs, and Discord won't allow me to post anything near that filesize on a server so... Yeah... Rip?

Blendy Wendy Fucky Wucky Timey Wimey
M4J1m0M.png

I've got a long way to go... But 61 is pretty good so far!
Apartments
hXzONwD.png

Still, working with basic edges / vertices, but this time using the fill and extrusion tool to create a more defined and less blocky outline to the shape and try to have more sharper edges that aren't just square corners. Overall it came out well, but the roof ended up not overlapping as much as it should have - But this wasn't even part of the course so I don't think it's a tragedy if it's not up to perfect standards.

Pyramid
VzD4hUP.png

Using more advanced basic techniques like loop-cutting and subdivision to add detail to an object. Also using the snapping feature to align things. One thing I did notice with this, is that the render engine - designed to deal with more detail and give a more polished output for some reason decided to die on the sampling rate, leaving spots of pixilation in some areas, which I didn't like, so the image above is actually the less - detailed renderer, which doesn’t seem that different from the more advanced one???... I think in cases where geometry is simple such as this, the difference between the two versions is reduced.
95YuCAu.png

( The image from the engine that is supposed to be give higher quality results.. )
Jg2oSrf.png

Note the horrible pixilation and noise.

FINALLY - SMOOTH OBJECTS
xfX841d.png

I've finally moved onto the point in the course where we start to work with more complicated meshes. And I gotta say the massive jump in detail that an object has is really something. While it may just be a simple bowling pin, the reflections on it really sell the depth of the item. To make it I used a flat reference picture, created a "Bézier curve" to make a flat outline of half of it. And used an inbuilt Blender function to rotate the line around the central axis to create an even mesh using the same line and forming said pin.

MOAR BOWLING
Once I had the pins done, the rest was really just making the ball (literally just a sphere with holes) and making a scene, came out pretty good - but I had to do some iterations until I was happy with the result.

h5vQQmP.png

bQxIrg0.png

6ku8DON.png

qMYD5Y0.png

3OUL1rm.png

74JSVn0.png

FAzGH6t.png

yhMVSr4.png

0PUEYkp.png

Overall I'm just happy I don't have to model more squares.


Sidenote:
As well as the Udemy Course, I've been spotting hundreds of Youtube Blender guides now (Thanks Personalised Ads), and my brain is getting overwhelmed just how much you can do with this software. I've seen crowds modelled as particles, bone systems perfectly replicating mechanical machines, animation, scenebuilding, character design, really just a whole world of things I all want to try, problem is: I know I have to stick to one guide at a time otherwise I'm never going to get it done... But some of them look soooo good. If you're reading this and want to dip your toes into Blender, here are some of my personal recommendations.

CG Fast Track - Really long and length videos, with no nonsense and a fast pace but still gives indepth explanations what things will do and how you should use them.

Grantt Abitt - A relatively easy and simple to understand set of tutorials, less is focused on detailed meshes and instead more blocky systems are used for modelling. But the methods are explained again- quite well and it goes at a relatively leisurely pace with each process split into it's own respective video.

Blender Guru - Apparently, one of the more well known tutorials within the community. Being a relatively easy to follow guide but at the same time giving satisfying and realistic looking products, even though it was a bad idea to try and do 2 different Blender Tutorials at once, I couldn't just help but watch some of this dude's videos. He provides an upbeat and energetic tone to this videos and even if you're completely new to blender by the end you still have a really good looking product. He also splits up his videos into smaller sections, around 15 minutes long each so I would definitely recommend!
(Yes this is the Donut one, You can see a completed course by one of our resident Nebulous Media team Here! )

There are others out there who also do less beginner guides and more advanced explanations!

Joey Carlino - Really Good character design guides. Also focuses on the more obscure community based workshop addons! Definitely worth a view if you want to see what's possible with Blender if you need inspiration.

Ian Hubert - Makes Genuinely amazing art: most of which blows my mind how much effort this man will put in to some of his scenes and details you would most likely miss if you didn't watch his videos at least 4 times. Also provides a lot of "X - Done lazy" videos, which often make use of particle systems or the inbuilt physics engine to achieve new, satisfying, and as the name implies surprisingly easy methods of normally complex items. Again- a real good example of a professional who puts effort into their craft.

Blender Guru... Again - I really cannot emphasise how much effort this man puts into making easily understandable yet gratifying guides that give such an amazing result. He doesn't just have the beginner guide either, he's got a wide range of warm and fantastical guides!
 
Last edited:
Reactions: List

TwistedSilicon

Magic Citrus Fruit Man
Joined
Sep 16, 2017
Messages
278
Nebulae
878
I CAN POST GIFS NOW WITHOUT HAVING TO DO THE IMGUR THING
BEHOLD:
FROGGY CHAIR (REALISTIC)
giphy.gif

Look at my boy go!

So yeah, Exams are finally over, and in the 2 days I've had to get back into the creative swing of things I'm happy with what I'm starting to create again. I'll be unofficially holding off with the blender stuff until I feel like I'm back in the groove... But for now...

M I M A L I S M
(A.k.a. my excuse to be lazy)
I created a bunch of mini-logos to use, in case I ever want to start up a group. Some of them are good, some of them are... Eh....
Anyways, feel free to use these in any form, if you want to add colour to them, go ahead, if you want to add text, go ahead, if you want to do anything to these you have my express consent. (For these only, but in all honesty who's gonna stop you, the internet police?).
mO3P2W8.jpg

b6FfHwf.jpg

sWHd84L.jpg

AXth5h9.jpg

nVt4Tx1.jpg

FOgbaaY.jpg
maVSMk5.jpg
l3IAGQt.jpg

KnZizkD.jpg

jwvUhwa.jpg

u74r1li.png

qT1bXtO.png

KSUOyus.png


HKT85Sk.jpg
 
Last edited:
Reactions: List

TwistedSilicon

Magic Citrus Fruit Man
Joined
Sep 16, 2017
Messages
278
Nebulae
878


5eaxBsT.png


Circle time!
So you know how I literally just posted yesterday that I was unsure if I was gonna be able to go straight back into Blender, well TURNS THE FUCK OUT I missed this software SO goddam much I've literally been doing nothing BUT blender stuff. This time I've been focusing on the material section of the render. And I've gotta say it's come out with some pretty cool stuff! I'll provide an overview after each piece, but if you just wanna look at the pretty balls- That's fine with me!.

giphy.gif

This one was one of my first introductions to animation in Blender AND using material shaders to create an effect. You can see I randomized the movement and pattern and stuck pretty close to the guide, the main thing about this was that I created it 4 weeks ago, so I had to a lot of referencing to this one when trying to remember how to basic stuff.
giphy.gif

giphy.gif

I made these two to show the difference in interpolation Blender uses, one being Bezier (simulates acceleration, and deacceleration respectively at both ends) and linear. Both give a satisfying effect, but linear is considerably more seamless in its repetition. Also ,yeah, most of these clips aren't even longer than 5 seconds so... Yeah animation is hard.
giphy.gif

Circles were good and dandy, but for this one when I mapped the two wave textures to a circle it looked... Squished and odd to say the least. Which wasn't what I wanted, so instead I put it on a flat plane looking directly against the camera.
giphy.gif

This one was using a new shader- It creates little islands that are useful for displaying a cracked or textured surface. I also used normals on this to try and give it a sense of depth to each crack and bump. The lighting ended up much less... Prominent than the others, something I should probably keep in mind when working with other non-emissive materials is to always add lighting. It's no good having a detailed material if that detail isn't lit correctly.
giphy.gif

This was my first attempt at mixing two textures together, ironically enough, I used a wave texture to determine the coordinates for the two wave textures I added. In the end it came out with a nice geometric and neat looking animation!
giphy.gif

This one wasn't to test any skills, it was mainly to experiment with a wireframe over a sphere and seeing what it'd look like if it was lit on the inside. Also see what happens to textures when you apply certain modifiers was interesting.

So- Overall looking good so far!, My projects on my to do list are:
  • Make a cop mask
  • Make an actual char mesh using Z-brush or the Blender equivalent
  • Experiment more with bone stuctures an IK bones
  • Animate some poses and actions
  • Import some SFM models into Blender, and have some fun using them in physics simulations
  • Stop posting Among Us shitposts.


iCbiQ42.jpg

BACK TO MAKING STUFF
Also I'm using this as my new Avatar because I like it : )
 
Last edited:
Reactions: List

TwistedSilicon

Magic Citrus Fruit Man
Joined
Sep 16, 2017
Messages
278
Nebulae
878

WbsSups.png

"I SUMMON THEE- BANNERS OF THE DEPTHS - RISE!" - TwistedCircle

TWISTED MAKES SOME BANNERS N' STUFF

So- Recently someone asked me to make one banner for them.
Of course, I immediately decided to go overboard the moment I am left to my own devices.
So yeah- experimented and made a crap ton of banners.


Folders!

So yeah, as I messed around with the banners, I was saving a lot of PNG's and JPEG's, and that's when I realised by making multiple sized banners, I could recreate a file system on the forums. So that's what I did. Enjoy. Also I recommend you centrer them to the right to make your life easier. (And yes- They aren't evenly spaced, and no I don't know why).

Folder END
60mPHcD.jpg

Fji3Cwl.png

SUkHzQS.png

0u9OyE2.png


Folder Subfolder (Colour Version)

28LzbtJ.jpg

B1bgoqM.png

0pLfKVn.png

qu956Ht.png


A
fIwfOhi.jpg

DHaMwB2.png

dUlkVSA.png

xFvTnbD.png


B
F4ILYhz.jpg

Y9RAWYY.png

98nqeOb.png

yd7kExd.png


C
BDDdJXq.jpg
aAkt0Ei.png
2Yop445.png
F6rE0BF.png


Document (Black and White)
T3pSpAw.jpg
XpnLqIw.png
lvb7HSe.png

2u1VgJO.png


Document (Colour Version)
pmJOdWb.jpg

IDP8Zpr.png
jXdfwYA.png
8xqMRqv.png


Folder Subfolder (Black and White)
x06IEW7.jpg
kb4lhcp.png
xfPtyW0.png
Kwu1OGY.png


Music
46ETBjm.jpg

ySXpVNj.png
Cfnql2a.png
vF2hUt3.png


Music 2
x1NFECA.jpg
TTFAXRX.png
axCFMqH.png

m99jxUs.png


Audio / Music 3

nSrJvjB.jpg

792bcqC.png

pMftu58.png

YmLsAMH.png


Note- There is limited space after the banner, so to give folders and items names, you'll have to switch the side to the right and add the text there.

28LzbtJ.jpg

MAIN FOLDER
B1bgoqM.png

SUBFOLDER‏‏‎ ‎‏‏‎ ‎‏‏‎ ‏‏‎ ‎‏‏‎ ‎‎‏‏‎‎
dUlkVSA.png

ANOTHER SUBFOLDER‏‏‎ ‎‏‏‎ ‎‏‏‎ ‎‏‏‎ ‎‏‏‎ ‎‏‏‎‏‏‎ ‎‏‏‎ ‎‏‏‎ ‎ ‎‏‏‎ ‎‏‏‎ ‎‏‏‎ ‎‏‏‎ ‎
YmLsAMH.png

AUDIO FILE.MP3‏‏‎ ‎‏‏‎ ‎‏‏‎ ‎‏‏‎ ‎‏‏‎ ‎‏‏‎ ‎‏‏‎ ‎‏‏‏‏‎ ‎‏‏‎ ‎‎ ‎‏‏‎ ‎‏‏‎‏‏‎ ‎‏‏‎ ‎ ‎‏‏‎ ‎‏‏‎ ‎‏‏‎ ‎
Hopefully that example made sense.
Again- These weren't exactly made with quality in mind, more of a proof of concept rather than a finished product.


Continues on next post...
 
Last edited:
Reactions: List

TwistedSilicon

Magic Citrus Fruit Man
Joined
Sep 16, 2017
Messages
278
Nebulae
878
... Continues here.

Part of the process.

These were the first I made, and yeah, I was kinda happy with the top two... But I wanted to see what I could achieve if I wanted to, so these were starters rather than final products, especially the last one.


Qsy3TRH.png

aiYmPuo.png

CQOViLE.png


Square Banners
These banners were made with some more experimental methods in mind, and I allowed myself a lot more freedom when creating and developing them. Overall they came out more varied, possibly at the expense of detail and production quality but eh. Not using these as a source of income so who cares what quality these are? My main processes were to vary the shapes and outlines of the banners I made them with, unfortunately I stuck too close to the squares and while they are a lot bolder, they lack that geometric variation I would like.

lIPlhXE.png

R76iA5Q.png

ysb2PxB.png

nMgtgnK.png


CV3kGAN.png


aBB5CQU.png


ALSO: over the next couple of days am going to be bored out of my mind. If you need something created, or hell just need some artistic advice, I will be MORE than happy to help. Hit me up on steam or even this thread if you feel like it. As long as it's... Something relatively close to what I've already done here.

aS7mVjV.png

*** You furiously mash the accept button. You now have one UV Sphere!
*** The circle looks happy with your choice.


Circle time continues.

Because one rambling post about spheres wasn't enough!
Less time to work on these this time- But I have been able to experiment with something new!, Displacement.
Unfortunately displacement is only available in the cycle render engine, which is notorious for being much much slower than Evevee- Some of these renders took up to an hour to render for 5 seconds of actual animation. So yeah, for the future I think I'll stick to Evevee unless I absolutely NEED to switch to cycles.


giphy.gif


giphy.gif

These- both- took- FUCKING- FOREVER TO RENDER.

So, I decided to mess around with displacement, and yeah they turns out pretty cool considered all I really did was apply one texture to the displacement map. And I've gotta say they both look sick as hell, and even despite my ramblings about timing, I'd say for with how they came out I don't mind them taking a bit longer.
giphy.gif

Not sure why it jumps at certain points, but this was my attempt at making a more digital looking sphere, with transparency really helping to sell the effect. (Again- not available in the Evevee render engine). The pulsating was also a nice feature, but in the future, it'd probably be better to considerably smooth out the movement to better fit the timing.
giphy.gif

It's supposed to be an animation, but the white noise texture I used was too fine and there's no scaling option so yeah... I tried I guess?, If you zoom in you might see it, But at least this didn't take anywhere near as long as the other three did.

So yeah- Main lesson is that rendering takes longer if you want it to look cool- but also, check how your animation looks before you start rendering, because once you stop. You will not want to quit halfway through- even if it's not exactly how you wanted it. Apart from that this week it's mainly just getting experience with Blender and Photoshop.

giphy.gif

Pretty sure that door is fake...


And yeah... if you couldn't tell: My photoshop animation needs some... Tweaks...


That's all folks. See you soon.
 
Last edited:
Reactions: List

TwistedSilicon

Magic Citrus Fruit Man
Joined
Sep 16, 2017
Messages
278
Nebulae
878


I cannot be stopped.
fEKQQAZ.png

So many designs... Such little time...


So- I had my last day of Sixth form today, as the term finally ended. And while yes- it was very sad, it now means I am FULLY capable of no-lifing blender every day non-stop for the Summer. So: Expect EVEN more models and renders over the next couple of days, if not possibly daily. (But please don't hold me to this)

Also yeah I did some more photoshop minimalism designs because I am pretty sure I have an addiction at this point.
L4rHeAB.png

CNN5KM9.png

qfUcebA.png

uSzyfqH.png

lTyn5eZ.png

Anyways- Photoshop tomfooling dealt with, back to Blender!


SD04SKa.png

I did not have sexual relationships with that sphere. - Bill Clinton

You know it, I just can't get enough of those UV spheres!, This time I decided to mess around with transparency values and different methods to achieve said transparency after having experimented with it last time using the digital stripe. This time, I had research and preparation on my side.

giphy.gif

A rather seizure inducing piece, this one was my first attempt at using another method of transparency, that instead of simply rendering the object as transparent instead refracted the light through it to give an internal reflection effect.
giphy.gif

Another experimentation using transparency, this one focused more on simply having a transparent texture that instead of having the environment be the active, instead the texture was.
giphy.gif

This was my attempt to use a third form of transparency, and while admittedly successful, overall it didn't quite stand out compared to the others when considering it's effects or lack of reflection... Overall a meh.
giphy.gif

A more interesting variation of transparency, where the refractive index of the material is changed so that some of it simply shows nothing while the transparent material that does show illumination, shows a more distorted and exaggerated effect. Overall a really cool way to create an artificial outline if I ever need one.
giphy.gif

Finally, I'm able to take advantage of the physics simulations of Blender, this was just a simple test of cloth being draped over a sphere. In the future it'd probably look much smoother if I gave the cloth itself some more polygons to work with when deforming.
giphy.gif

Again- Physics, this time it's a soft body I rotated around a point, could definitely be useful in the future for food and other soft objects that shouldn't quite have the same density as a brick like most materials do.

Q8hQyyM.png

*** Pretty sure that book has nothing to do with Chess.

Yup!, That's right I've finally done something other than spheres. I've had this on the back burner for a while until I felt comfortable using materials and animation to thoroughly display my modelling work rather than just posting a flat image which... Somewhat counteracts the detail I would put into one. But that goal has been reached, and I'm finally gonna start working on some more detailed models like the bowling pins I did previously.

This time it's a chess board. Hopefully I should make it within the next week considering I've got the rook, and pawn already down.


xtQlNCH.png

OOoh Shiny!
giphy.gif

So- I thought about turning the pawn around to show off the details, but instead I thought- What if I tried something new, so instead of rotating the pawn- I linked the camera to the centre of the world and spun it round!, I think I'll definitely use this in the future to show off some of my more hopefully detailed models.
FrankFlusteredClumber-size_restricted.gif

This will be the more obvious factor of my chess set to differentiate it from the normal 32 piece set. I'll instead be modelling it off a glass set like this:
510YSw2X9hL._AC_SX425_.jpg

Overall, it should come out as a really nice product- Especially with all my wonderous lighting options now I've figured out point and emission lighting modes.
kHOWy3B.jpg

R o o k
giphy.gif

Again- Very similar to the previous one, however this time the sun is a more significant angle rather than there just being global lighting to show off the highlights and the shadows of the model. Not sure which I prefer at the moment... Guess we'll just have to wait and see!
UncommonLittleBandicoot-size_restricted.gif

Used different coloured stripes this time, again- the rook is supposed to look as if it's made out of glass, however: One thing I'm probably gonna work on is making it look more frosted towards the bottom... Which means I'm gonna have to use volume functions... So- Expect volumetric spheres next! (I swear I'll do more models I'm not just doing these two)
gpBipZU.png

That's supposed to be an art brush.

Note: Please go check out Trains' thread on this if you already haven't. I'm not claiming I wasn't insipired directly by his thread to do this. Go give him some love. He's made some good stuff already.

So, I saw that Frent hadn't had his avatar done yet so I gave it a go myself, not sure if it has that professional Microsoft paint look to it, but hey- give me a break, I'm a novice. (/s)

7qWxUby_d.webp

lXaf63K.png


giphy.gif

You're pretty sure that door is STILL fake

Anyways folks- See you soon! And happy half-term!
 
Last edited:

TwistedSilicon

Magic Citrus Fruit Man
Joined
Sep 16, 2017
Messages
278
Nebulae
878

Mvo7Lcz.png


Because learning Blender wasn't hard enough!
But yeah, nah I'm also learning After Effects as well, considering my recent interest in Photoshop, I found it suitable to try and pursue this as well. I seemed to remember someone making animated DOTA 2 posters with this- so yeah, hopefully I should be able to create some pretty FLY looking posters soon (with Animation and effects included!). So look out!


WellgroomedPepperyFish-size_restricted.gif

Made with Adobe After Effects!

What I did for most of today:
Seething
Coping
Hating Adobe, despite them not owing me a single thing.
Trying to uninstall Adobe Creative Cloud.

QTeiEEi.png

This is so sad... Can we get 10,000 neb?

So, yeah I'm not gonna say what happened for legal reasons, but I spent most of today messing around with certain programs that refuse to export their results as anything but massive dumps of images, AVI files (Which are GIGA-BYTES in size), or audio only files. So yeah, it's fixed now, but unfortunately that did mean my photoshop capabilities were reduced... I fixed it eventually, so expect more minimalistic designs in the future (BUT THIS TIME THEY'LL MOVE!!!)

ALSO in other news, I can now post gifs larger than 780 * 280, turns out the gif hosting site I was using limited them, but now that I'm using a new and better one, I can post MUCH larger gifs and images. And I have started to retroactively go over some of my previous posts to truly present the renders in their correct size.

DDKjXQ9.png

Side note: I had this on my computer for some reason. It doesn't have a title, but I'm using it since I can't make any others right now.

THE BLENDING CONTINUES

The pieces fall into place

Bishop this time, unfortunately I would've linked to have more than just one piece done today, but I've been chilling and recovering from college.
M3nSwBP.png

A pretty simple cycles render, however, you'll notice a distinct lack of noise on this one. Which is thankfully due to the fact I finally figured out that I can quite easily increase the quality of the render in the settings with ease, and product a much more better path-traced image. Resulting in this! Hope you like it.
SlimyVillainousKoalabear-size_restricted.gif

A pretty good looking spin at the model. I think I prefer these over the simple stationary light method I took with the pawn, so in the future expect to see a lot more similar to this.
SlowFeistyLabradorretriever-size_restricted.gif

The transparent render, chose something to spice up the plane texture a bit by using a different method this time other than a simple wave function. Again- it gives a really nice effect when the lighting changes as it extenuates the transparent effect rather than a flat colour applied to the thing.

"<:: GRENADE ! ::>"

UoTbqGC.png


This time I went for something a bit more useful if I were to ever make a game, a simple poly model designed to look like a futuristic grenade. I give it some stripes and a cool looking interior!

ImpressionableEsteemedGalapagosdove-size_restricted.gif

As shown- I added a liquid texture to the interior to give it the effect of it containing some sort of well... liquid. Overall, I like how it came out as some parts had different speeds and consistencies.
MassiveHeavyGuanaco-size_restricted.gif

Of course!, A grenade needs to bounce!, But this was another demonstration of using the inbuilt blender functions to easily do a quick simulation between a plane and the grenade. Overall it gave a pretty satisfying result once I modified the bounce factor of everything. Also helped me realise that the origin of the shape does in fact have a result on the physics.

MadeupHotAmericanbulldog-size_restricted.gif


SEE YOU SOON. I'LL HOPEFULLY HAVE PHOTOSHOP UP AND RUNNING BY THEN.
 
Last edited:

TwistedSilicon

Magic Citrus Fruit Man
Joined
Sep 16, 2017
Messages
278
Nebulae
878
pd5rB06.png

35%!
I've been relatively busy today with IRL stuff, so not a lot to present. But I'll show what I have done.
mbxooXX.png

ADOBE AFTER AFFECTS
So, I tried my hand at some After Affects stuff, turns out it's relatively simple,

I was gonna post one of my other projects here, but then I realised it would be complete plagiarism since I didn't own the original poster I added affects to. So... Uh yeah have this shitpost instead.


You know the drill by now- Photoshop Minimalism poster and then A blender render.
(And yes- I now have photoshop back up)


QWB9J8F.png

4unT2XH.png
HoGFTLv.png

A quick SCENIC render this time. With a few models clobbered together, again- Really didn't have much motivation OR time today so this is kinda not exactly some of my best stuff.

I liked having the emmision inside glass, but that kinda got lost on the more detailed render
Also some of the wires didn't render correctly and have their stripes going compeltely the wrong direction.
And the main piece is pretty geometric at some points...

Oh well.
t0jBZbu.png

I'm also working on a website so I can more easily create a portfolio of my stuff with a proffesional look rather than just dumping everything onto a thread... It's not exactly a peice of art at the moment, but it should be better soon.

Sorry that there's not much today. But hopefully some stuff should be changing soon to enable MOAR CREATIVE POWAH and maybe even some group projects!


Last edited:
Reactions: List

TwistedSilicon

Magic Citrus Fruit Man
Joined
Sep 16, 2017
Messages
278
Nebulae
878

HarshPaltryBellsnake-size_restricted.gif

I don't actually drink Coffee or Tea... So pretend it's hot chocolate I guess?
Weekend Time
So, coming up to the end of the weekend, I'd honestly have hoped I could have got some more Blender stuff done, but unfortunately I've been pretty bogged down doing other stuff around the house.

Though- despite that I've still made some progress on some Blender stuff.
LJaijvJ.png


As well as making the pieces, I also needed to make a board to house said pieces.
Something interesting to note: was that due to the fact I modelled the board at it's real size (i.e. Relatively small compared to most Blender Projects). Most of the shadow settings didn't actually work and I had to manually set each light to allow for shadows respectively.
Also yeah the lighting's better. Colour theory is cool.
4jdEpDp.png

Sorry for the ugly ass title-card but I just throught that image of a cat was so odd I just had to put it in. (I didn't make it btw)


For this one I just followed an online tutorial. Nothing really that special other than it only really works on medium or high density objects, since things that have too little geometry (see the monkey) end up looking blocky and odd, as well as loosing some of the lesser details such as the mouth. Overall a cool digital affect, but depends on the model.


Not a lot to present this time around, but right now I'm just waiting for some things to go through the proper processes, so stay tuned.
 
Last edited:

TwistedSilicon

Magic Citrus Fruit Man
Joined
Sep 16, 2017
Messages
278
Nebulae
878

Update

Over the last couple of weeks I've been pretty inactive on HL2 RP and Neb as a whole,
I thought it was just burnout, but despite not having played on the server for some time now I can't see myself coming back to the gamemode.
I just don't find the server fun to play anymore.
Which kinda bums me out.

And that brings me onto a another thing.
The posts that I do make don't really seem to get a lot of recognition, which I unfortunately measure by the neb count.

While I don't want to complain about nebs or try and guilt trip you into giving me the epix nebulous rating ,it does hint that despite my efforts: my posts are not as engaging, exciting
or simply put: good enough as I'd like them to be.

(Sidenote, I just wanna outline that you are in no way indebted to like my art simply because not doing so would supposedly make me feel sad, you should only neb if it you think it's worthy. That sort of karma-whoring behavior is both pathetic and manipulative and I do not condone it. There is no /s here.)

My last four posts before this one have a total combined 1 neb between them.

But- enough complaining and self-pity, what I really would like above all else is not your ratings specifically, but just any form of feedback be it positive, negative or something inbetween.

It feels as if I've been posting to myself on this thread for ages now and I can't help but wonder if that really is what's happening, if I'm just writing these pages endlessly and all the views on them are myself constantly checking if I there's any more updates or if anyone has responded.

In the last 15 posts, there has only been one message which was NOT mine. And while I understand it is MY art-thread, I am going slightly stir-crazy in my basement Dorito cave waiting idly for someone to post to this thread or on the community request tab all by myself here.

(I am aware there is view tracking on some of the gifs I post, however the ones I did not post to this thread ALSO somehow have views despite being private so I get the feeling I cannot trust those metrics).

So - please: If you have any comments, recommendations, requests. if you think posts like these are rambly and boring, if you despise my usage of bloom more than anything, if you have any criticism or critique.

Tell me, I beg you.

It's so much considerably harder to improve when you're judging your own work.

I'll consider posting to art of the week, but I feel as if that should be reserved for Hl2RP based pieces of art.

Anyways- Rant concluded

Back to art time


Messing around with gradient textures and clamping functions to create a loop effect, similar to the wave texture I've used before, but gives a lot more control (e.g. arc size, position, offset) without having to manually transform the object the texture is being applied to.

giphy.gif

Yes, I can in fact not turn on Bloom for once. I think in this case, this one looks better.
giphy.gif

Bloom. Kinda blurs the lines between them and ruins the simplistic nature with the blur around each portion.
 
Last edited:

TwistedSilicon

Magic Citrus Fruit Man
Joined
Sep 16, 2017
Messages
278
Nebulae
878


Might stay, might go. But for now I post.
Not really feeling up for comentary or self-reflection.

I fucking swear if the exact same thing happens again I am going to virtually implode.
jehpP6u.png

ueFc1ZA.png

JyChfTy.png

SXoW67p.png

pXPU9pK.png

67xCgEK.png

jQNhW6a.png

cZYDUnD.png


Last edited:
Reactions: List

TwistedSilicon

Magic Citrus Fruit Man
Joined
Sep 16, 2017
Messages
278
Nebulae
878


I'm BAAACKK
For Now


m7fEgue.png

Time's just a social construct anyways.


TastyKlutzyChamois-size_restricted.gif

Blender Shizzle
Blender Shizzle
Blender Shizzle

I'm still making progress, especially with animation. I've found the whole process daunting in all honesty, but I should get into it soon.
UnfinishedDaringDamselfly-size_restricted.gif

One of my more relatively interesting makes, made some basic bodies using a handy tutorial found here. Good-ish topology. Hopefully I can use these as bases in the future.
WaterloggedUnpleasantGuillemot-size_restricted.gif

I made this at 1 am in the morning send help.
Yeah another modelling practise, with a square attached afterwards.
LameRespectfulArmyant-size_restricted.gif

A physics simulation, getting used to animating physics for certain periods of time. (I.e. Both giving the rock it's starting velocity and stopping it once it's off screen).
AppropriateAstonishingHapuku-size_restricted.gif

Can you even see what's moving here?, Because it took 3 hours to render for the vague noise you see called caustics to show up. A good look, but maybe I go for a less graphical mimicry next time. Also sand, using a displacement map.
AlarmingGenerousIndianrockpython-size_restricted.gif

A quick showing of Blender's Volumetric features, useful for thick fog or concealing far-away background details.
FarawayObedientFrigatebird-size_restricted.gif

Look at the pretty dice.
:grinning:

fEKQQAZ.png

I do not want to tell you how many folders exist in my one photoshop document for these. You're only seeing the ones that led to something..


q6ugLED.png

Literally a meme I made just to get back into PS, though it came out semi-decent?, I think a better selection of pics as references for the image poses would have made it better, or simply sticking with the middle one and instead adding detail around the edges instead.
jIpZUMs.png

A more 3D styled fairly simplistic piece, I wish I could more of these and make them more complex, but getting the shapes in photoshop is incredibly tedious and in all honesty, I'd be better off using Blender. The corners have to touch, and unfortunately there's no easy to modify the outline or path of a shape once it's been made (at least to my knowledge).
9DPjGwK.png

YanFxQ4.png
I distinctly having to steal half of the eyes I have ever used from the internet because I am absolute balls at using the pen tool. So I made this, I used the drop shadow on the later one to give it a more foreboding and over watching sense. But I am slightly concerned if it still looks eye-like, the massive section missing from the main circle can someone disjoint the whole image from the eye look.... Maybe add some shine or reduce the section taken out next time?
8dMbvBO.png


Some messing around with masks and circles, creating a kinda long petal ring one the outline. While good, it feels as if putting a different shape in between would help spice things up. To try and help break up the fairly regular outer shells. (And important- it must not break the outer negative space of the circle, the impression should remain).
zL2Z4c1.png

Again- the same principle applied to the previous one, except the empty space is filled with the small variations of the outer shell this time instead of simply cascading down into the centre. Creates a much better effect.
E7JUqaR.png

Ek11jgw.png

Using some of my previous methods to create logos, namely using text as a way to create shapes. For example a U was used here, then flipped upside down and added, creating a pretty cool effect I'd say!, Again the drop shadow is used here to convey a sense of being above and watch full.
Yp57GCF.png

????
???????????????
??

Yeah- pretty self explanatory, using text again but this time rotated around in a 8 sided pattern.

Not exactly one of the best tbh.
kVfUOZs.png

So turns out, you can use cursive text as well to get that wrinkled and noisy effect.
Also turns out this cursed abomination is what happens when you try to make the : ) face in cursive. So yeah.
zjlbE5c.png

I included this one, because while I liked it, I felt as if it was sincerely lacking something, and while normally that would be grounds to not include an image, for this one I felt as if once I did fix it: It would be quite good. Still... Not quite sure what I'm missing / need to fix.
1J0Tc1g.png

So yeah turns out you can actually just add Emoji's in photoshop now. Which is cool.
Juo01uk.png

More usage of the emoji application with photoshop, but this time used somewhat more tactfully than just a peach circle. Though unfortunately it does somewhat remind me of all the Joker memes.
R3WIcKK.png

A fairly simply design, not much to say. Added some little flairs at the top and bottom to spice it up.
bZaBtZz.png

Designed to be a confusing mess, I'd say this one perfectly reflects my obvious intention to mirror societies need for self-validation while also providing a balanced critique on the temperature of the beans can in my microwave with a hint of commentary on the morality of quantum tunnelling.
sEr73Db.png

5a6R7CF.png

yTPqXbO.png

gES6Maz.png

Showing off how many variations I can make with slightly moderations to one shape. These all come from the same basic arrow shape, but have all been modified in various ways to get different effects. I kinda like the sharp edges and various barbs they each have, gives a kinda techno-cult vibe.
2IK1MMt.png

pHBXpLl.png


A collection of circles with various bits taken out of them. The first two are very similar yet, feel different enough for me to put them as seperate things. Maybe I should use these to further investiage negative space and how breaking it up with certain shapes affects how it feels?... Maybe maybe not I am sleep deprived and it's 2AM as a write this.
ngK05Nn.png

A collection of circles with various bits taken out of them. The first two are very similar yet, feel different enough for me to put them as separate things. Maybe I should use these to further investigate negative space and how breaking it up with certain shapes affects how it feels?... Maybe, maybe not, I am sleep deprived and it's 2AM as a write this.
Y1KJM2a.png

tgXY6eb.png

Some pretty good looking horns I got using a filter called polar coordinates which basically turns stripes into circles and vice versa. I liked the variation in them with the top being much more beefy and "attack orientated" for the lack of a better word. Also the second one reminded me of this fuck.
REOLGc7.png

Like a companion cube, but dedicated to the furtherment of mankind instead.
mItRHR7.png

It's actually just disappointed that you didn't do that thing you definitely said you were going to do.
Fairly simple once gain, just add some circles and lines and you're done. Mainly just to practise drawing shapes again
1tq8PBT.png

The stubbed ends on the horns and the almost bracket-like items in between give this a real mechanical vibe. Though it doesn't quite curve around a head like you would normally expect horns to, instead they kinda just occupy a triangle... So yeah maybe one day fix that.
TN6c5Lw.png

More adventures using negative space.
I quite like this one, it came out with a real nice look to it with the shark blade like arrows on each side pointing down on either side. Also the bandana really sells that "I am going to shank you" vibe.
4vAgV3j.png

I genuinely can't remember what I imagined this as, so now it's a Rorschach test, remember to leave what you like down in the comments, hit that subscribe button and turn on that bell. (Please don't I want to keep my santity).
NnU4kas.png

It's the spooky clown!

SPOOKY

Also the drop shadow gives the makeup effect that clowns use, note that the shadows go down here instead of up to accommodate this.

Also, next time maybe I make the eyes look less like commas?
eZZTu2L.png

Again- a fairly decent silhouette, but I get the feeling the nose is too prominent, but removing it just left a blank empty space where it clearly should be. But sizing it down felt wrong aswell. Really not sure what to do about this....
24Q7BSN.png

More silhouette art. Also the bottom curve does somewhat ruin the outline since I always kinda see it as a smile, but once again- removing it just leaves a hole where something should clearly be and altering the curve to a more straightened version just disrupts the flow of the face.
UxLIIHB.png

Uhhhhhhh.................


Hey oh wow look it's another Rorschach test I totally didn't forget what this was either.
EJH0HoB.png

Taken from the last one, but made to have a more defined character outline with a specific head. Came out pretty good I'd say, but the gap in between the bottom arc and the middle one should probably be filled or the top arc be extended out to take up the entire bottom area.
CIpNuYO.png

Pretty simple.
ZaAPL7j.png

Not exactly a pleasing design, but a interesting one. The spikes on the outside and inside give it a sense of danger while the 7 different arms give a sense of other-worldliness, that or I'm running out of things to say.
RI05Sn3.png

Can you see the Dwarf?
Can you see his beard, his hair?
His nose?
His forehead?
He sees you.

Again- this silhouette is a bit weak in terms of keeping a coherent design and outline. So it may be harder to see what I'm going for here.
dIwJF4Y.png

Reminded me of the old Bloodbourne hunter headgear.
latest

Hopefully I'll be able to come back to the re-launch of Helix.2, and have some fun on the server again. So until then, see you all later!

giphy.gif
 
Last edited:
Reactions: List

TwistedSilicon

Magic Citrus Fruit Man
Joined
Sep 16, 2017
Messages
278
Nebulae
878


A Big Milestone!

LzZrb6V.png


XzGefqJ.png


55%!

I've been getting through this course for ages now, but it's satisfying to know I'm making progress at least. It's been nice to look back at some of my old projects and see just how far I've come with this stuff.
Not to mention all the fun I've had while doing it.
Another 45% to go... So uh... Wish me luck?


Now, onto to the main course. And I've got a surprise for you dear viewer.

LonelyOrangeDuckling-size_restricted.gif


Blender Shizzle PLUS


THAT'S RIGHT
I FINALLY GOT THE SOURE MODEL ADDON

I don't know why it took me this long to install it.
LET'S FUCKING GO
So, yeah, this had kinda always been the goal ever since I started learning Blender, getting frustrated with the lack of creative control I had in Gmod Posters. I have some distance to go in being on-par with the posing and landscaping level I was previously (See next posts), but it's at least a start.

But yeah, standard pose, standard lighting, came out well enough!

DrearyFirstBlobfish-size_restricted.gif

The first time I managed to get a source model to import correctly with most of the textures intact. I tried to attach the gun to the cop and make a "Really Cool Scene" but you can't snap objects to bones in Blender, and with my current Blender posing skill, that wasn't gonna happen so I just made this instead. Enjoy!
VelvetyTornEmeraldtreeskink-size_restricted.gif

Some posing practise, considering that I haven't touched any Gmod posing for about 5 months, I'd say it was relatively okay?
Though I feel as if the (their) left arm is somewhat floating and doesn't quite fit in with the rest of the pose. Also the elbow should be slightly lower so that the hand stands out more from the body, also the lighting doesn't really vary enough for the image to feel alive, maybe make some areas but what would you vary lighting wise here?, changing it even slightly too much action for a simple thumbs up pose, but that's beside my main concerns with this one. Overall, I really just need to get some more posing practise.

HastyOpulentGuanaco-size_restricted.gif

OddballBlindKilldeer-size_restricted.gif

Interesting fact, I actually based this one off one of my old Gmod screenshots, before I even discovered the poster functions within it. Namely: this one, and dear god is it a complete woah moment to see just how far I've come from those early days. To compare how much I've advanced, it really is just insane for me.

Now onto the actual images themselves, the first one is relatively okay, apart from the fact that for some reason, instead of simply spinning the mask around with a stationary camera that's easy to use, I chose to spin both the Camera AND lighting, which creates that awkward effect of lighting on the back of the mask. Where normally from the front you'd expect 0 lighting, it shows up for some reason, which... isn't great. Something to keep in mind for future renders perhaps, where only the front is interesting, only keep the front lit.
The second one was relatively easier, the main problem was getting the bobbing right- and making sure it looped perfectly, which I managed to do with the help of adding a sine function to the height. Next steps would be to add some rotational bobbing as well to really sell that up and down loose and disconnected effect.


And of course, I also did some more photoshop stuff because it's easy and helps me explore creatively.

I'll only be commentating on some this time.

SOddzXC.png

fTU3xCi.png

MS4P04R.png

This actually an improved version of one of the logos I did from the week before. But now it's filled with a shape and complete. Much better looking in my opinion.

LaPFLsY.png

HOag9Vc.png
Closing words

So, with my exploration of source models finally started in Blender, hopefully things on from here out should be a bit more... relatable?, at least familiar. It feels weird to have finally reached the point where I can comfortably do this in Blender, namely because I've been putting it off forever due to the fact I was worried I'd feel overwhelmed and quit straight out. I still have a lot to learn (Inverse Kinematics, how to animate human limbs, how to animate camera movements in a fluid fashion, how to add dynamic effects), so my journey is still far from over, but in all honesty it feels surreal for this thing I've been working away at for about 5 months to finally give some cool looking (Not that my previous posts weren't the COOLEST thing in the entire world) outcomes.

Also, some of you may have noted that I've put spoilers around some of my old posts, that's because it was taking like a solid 2 minutes each time to load up ALL the images on this page which was a nightmare for mobile, so hopefully that helps not only for a better viewing experience but also reduces the amount of stuff you have to scroll through to get to the newest and freshest """""""""""""""""Art"""""""""""""" I've made.

Well that's all for now, I'm going to be busy over the weekend so I probably won't be on the server when it starts up, so make sure to have my fun on your behalf okay?, Cool.


giphy.gif
 

Deleted member 5501

The Civil Authority Grindset
B A N N E D
Joined
Apr 1, 2018
Messages
3,051
Nebulae
2,908
question, what are the ramifications for using your work, claiming it as my own and slandering you as a copycat? Presumably nothing? im genuinely curious because i see the phrase "you may use my work as long as credit is given" yet it seems no hindrance to most who just copy artwork and then sell it onward as their own.
 

MaXenzie

Sexually attracted to robots
Media Developer
GTA RP Playtester
Joined
Apr 26, 2016
Messages
17,276
Nebulae
24,626
question, what are the ramifications for using your work, claiming it as my own and slandering you as a copycat? Presumably nothing? im genuinely curious because i see the phrase "you may use my work as long as credit is given" yet it seems no hindrance to most who just copy artwork and then sell it onward as their own.


since you get automatic copyright on art in the UK, he would show that he created the art by showing the photoshop files or whatever program he used to create it

and then he'd sue the fuck out of you
 
Reactions: List